


Test Standards
- RTCA DO-160: Environmental Conditions and Test Procedures for Airborne Equipment
- SAE J1211: Environmental System Performance Testing for Automotive Electronic Equipment
- IEC 60068-2-14: Environmental Testing — Part 2-14: Test Methods N: Temperature Cycling
- ISO 14971: Medical Devices — Application of Risk Management to Medical Devices
- ISO 16750: Road Vehicles—Environmental Conditions and Tests for Electrical and Electronic Equipment
- IEC 60917: Modular Specification for the Development of Mechanical Structures for Electronic Equipment
The dual-zone thermal shock chamber also complies with testing standards including IEC 61587-1, IEC 60601-1, IEC 60335-1, and IEC 60721.

Typical Application Industries


Automatic hot and cold cyclic shocks
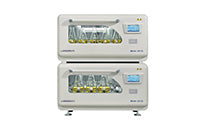
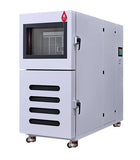
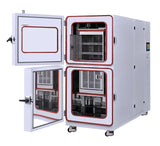
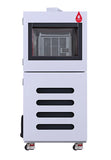
The two zone thermal shock test chamber designed to subject a Device Under Test (DUT) to severe thermal stress by rapidly transferring it between two independently controlled, extreme temperature zones (one hot, one cold) in an extremely short time.
- The Essence: The test evaluates the product's ability to withstand instantaneous changes in temperature.
- Physical Mechanism: When a product is rapidly moved from, for example, a high-temperature zone to a low-temperature zone, the different materials and components within it contract or expand at varying rates due to their unique Coefficients of Thermal Expansion (CTE). This discrepancy generates massive internal stress and shear forces at interfaces, solder joints, and material connections.
- Test Objective: To quickly expose latent defects arising from design, material selection, or manufacturing processes, such as:
- Solder joint fatigue and cracking
- Material delamination (layer separation)
- Component package cracking
- Structural or sealing failures
1
Hot Zone (Pre-heat Chamber)
The independent zone employs high-power heaters to maintain and stabilize the air temperature at the set maximum value (e.g., +150°C or +200°C).
2
Cold Zone (Pre-cool Chamber)
An independent zone that uses a Cascade Refrigeration System to maintain and stabilize the air temperature at the set minimum temperature. (e.g., −55 °C or −65 °C)
3
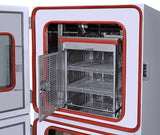
Specimen Carrier
Holds the DUT and is moved between the two zones by a dedicated transmission mechanism (pneumatic).
4
Quick Transfer Mechanism
Ensures the basket moves between the two extreme temperature zones for meeting the "shock" requirement.
5
Programmable Controller
Manages the entire test cycle, allowing users to set temperature limits, Soak Time (exposure duration), and the total number of cycles, while logging test data.
6
Automatic Zone Transfer
Thermal Shock Chamber is not only capable of automatic thermal cycling, the realization of automatic, rapid temperature zone switching for precise cyclic shock testing is its fundamental purpose of design and operation.
Specifications

Test Space Volume
50L
100L
200L
SKU
CJ100
CJ200
CJ500
Inner size (W*D*H)
450*450*500mm
600×600×600mm
800×800×800mm
External size (W*D*H)
900*2050*2000mm
1100*2220*2100mm
1120*2400*2200mm
Test area size
370*360*380mm
430*490*500mm
650×650×500mm
Temperature range
-65~200℃
-65~200℃
-65~200℃
Temperature fluctuation
±2℃
±2℃
±2℃
Test area temperature fluctuation
±0.5℃
±0.5℃
±0.5℃
Load capacity of test area
40kg
40kg
60kg
Hot exposure range
60℃~200℃
60℃~200℃
60℃~200℃
Heat-up time
Within 30min from ambient temp.to +200℃
Within 30min from ambient temp.to +200℃
Within 30min from ambient temp.to +200℃
Cold exposure range
-10℃~ -65℃
-10℃~ -65℃
-10℃~ -65℃
Pull-down time
Within 80min from ambient temp.to -65℃
Within 80min from ambient temp.to -65℃
Within 80min from ambient temp.to -65℃
Temp. recovery time
Within 5min
Within 5min
Within 5min
Transfer time between hot & cold chambers
Within 15 seconds
Within 15 seconds
Within 15 seconds
Power Supply
220V/380V/480V, 50/60Hz, 3-phase
220V/380V/480V, 50/60Hz, 3-phase
220V/380V/480V, 50/60Hz, 3-phase
Power
6.5kw
9kw
14kw
Heat Dissipation
Air-Cooled System
Water-Cooled System (8~10HP Chiller required)
Water-Cooled System (12~15HP Chiller required)
Refrigeration System
Binary Cascade Air-Cooled Refrigeration System
Binary Cascade Air-Cooled Refrigeration System
Binary Cascade Air-Cooled Refrigeration System
Refrigerant
R404, R23
R404, R23
R404, R23
Noise level
Max 65dB
Max 65dB
Max 65dB
Test Space Volume
50L
SKU
CJ100
Inner size (W*D*H)
450*450*500mm
External size (W*D*H)
900*2050*2000mm
Test area size
370*360*380mm
Temperature range
-65~200℃
Temperature fluctuation
±2℃
Test area temperature fluctuation
±0.5℃
Load capacity of test area
40kg
Hot exposure range
60℃~200℃
Heat-up time
Within 30min from ambient temp.to +200℃
Cold exposure range
-10℃~ -65℃
Pull-down time
Within 80min from ambient temp.to -65℃
Temp. recovery time
Within 5min
Transfer time between hot & cold chambers
Within 15 seconds
Power Supply
220V/380V/480V, 50/60Hz, 3-phase
Power
6.5kw
Heat Dissipation
Air-Cooled System
Refrigeration System
Binary Cascade Air-Cooled Refrigeration System
Refrigerant
R404, R23
Noise level
Max 65dB
Test Space Volume
100L
SKU
CJ200
Inner size (W*D*H)
600×600×600mm
External size (W*D*H)
1100*2220*2100mm
Test area size
430*490*500mm
Temperature range
-65~200℃
Temperature fluctuation
±2℃
Test area temperature fluctuation
±0.5℃
Load capacity of test area
40kg
Hot exposure range
60℃~200℃
Heat-up time
Within 30min from ambient temp.to +200℃
Cold exposure range
-10℃~ -65℃
Pull-down time
Within 80min from ambient temp.to -65℃
Temp. recovery time
Within 5min
Transfer time between hot & cold chambers
Within 15 seconds
Power Supply
220V/380V/480V, 50/60Hz, 3-phase
Power
9kw
Heat Dissipation
Water-Cooled System (8~10HP Chiller required)
Refrigeration System
Binary Cascade Air-Cooled Refrigeration System
Refrigerant
R404, R23
Noise level
Max 65dB
Test Space Volume
200L
SKU
CJ500
Inner size (W*D*H)
800×800×800mm
External size (W*D*H)
1120*2400*2200mm
Test area size
650×650×500mm
Temperature range
-65~200℃
Temperature fluctuation
±2℃
Test area temperature fluctuation
±0.5℃
Load capacity of test area
60kg
Hot exposure range
60℃~200℃
Heat-up time
Within 30min from ambient temp.to +200℃
Cold exposure range
-10℃~ -65℃
Pull-down time
Within 80min from ambient temp.to -65℃
Temp. recovery time
Within 5min
Transfer time between hot & cold chambers
Within 15 seconds
Power Supply
220V/380V/480V, 50/60Hz, 3-phase
Power
14kw
Heat Dissipation
Water-Cooled System (12~15HP Chiller required)
Refrigeration System
Binary Cascade Air-Cooled Refrigeration System
Refrigerant
R404, R23
Noise level
Max 65dB


- Choosing a selection results in a full page refresh.